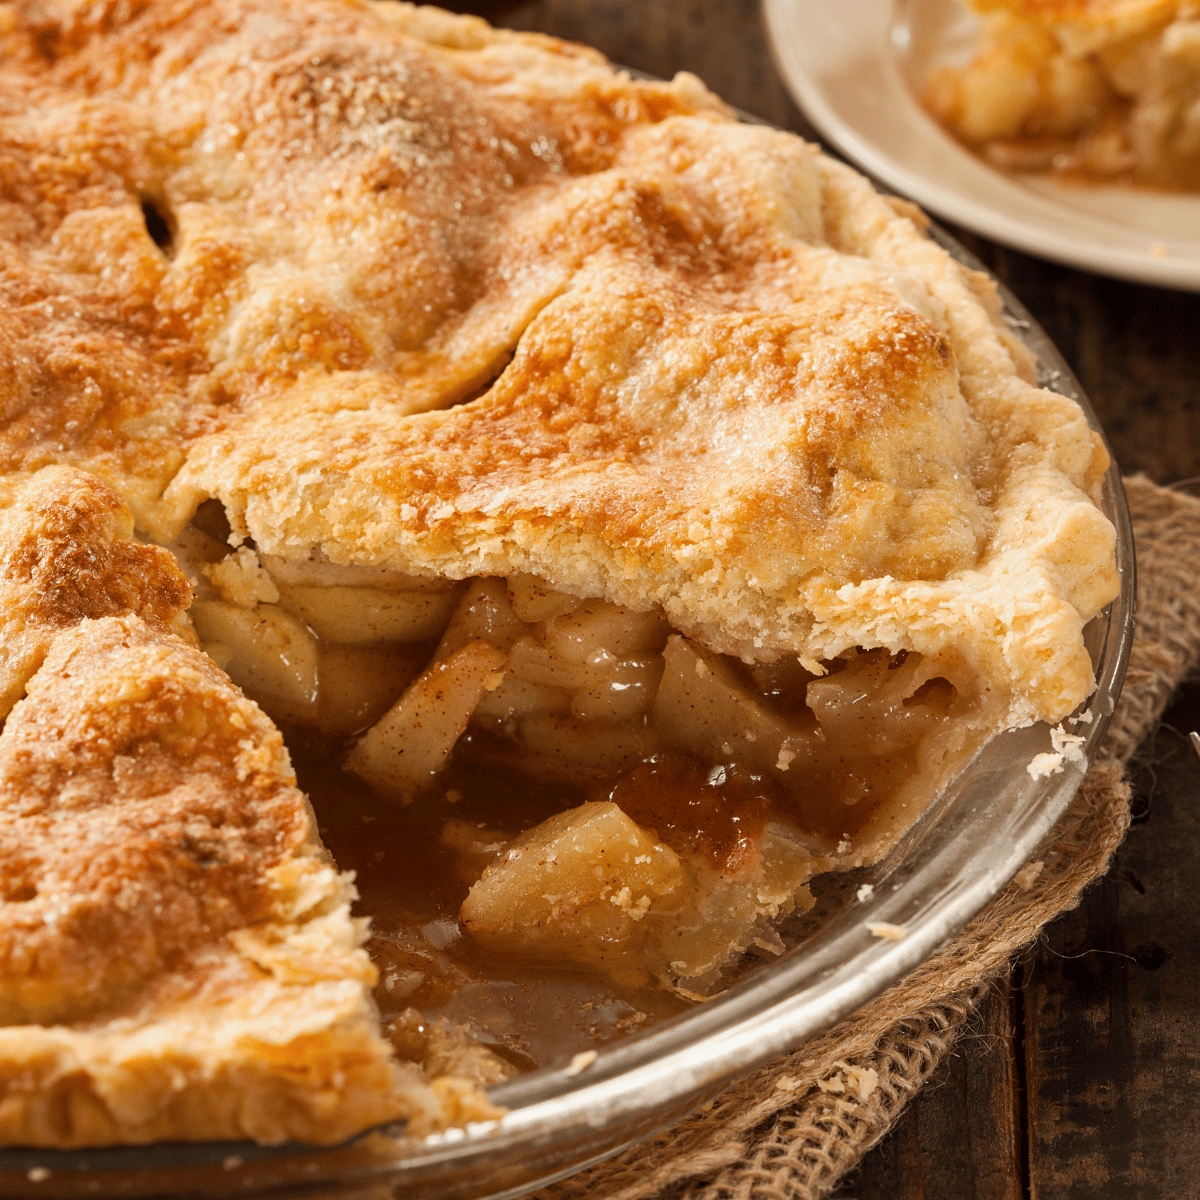
Imagine the sweet, comforting aroma of baked apples and warm spices filling your kitchen, the promise of a truly classic dessert. This Best Homemade Apple Pie isn’t just a pie; it’s a slice of pure, unadulterated joy, with tender, perfectly spiced apples nestled in the most incredible, buttery, flaky crust you’ve ever made. What makes this apple pie truly special is the no-fail crust technique and the perfectly balanced apple filling that guarantees a delightful experience from the first bite to the last. Perfect for holiday gatherings, a cozy weekend treat, or whenever you crave a taste of nostalgic comfort, this apple pie recipe is so rewarding to make, it’s sure to become a cherished family tradition. You won’t believe how satisfying it is to create such a masterpiece from scratch!
Prep Time: 45 mins (plus at least 1 hr chilling time for dough)
Total Time: 2 hrs 30 mins - 2 hrs 45 mins
Servings: 8 slices
Ingredients:
For the Buttery Flaky Pie Crust (Double Crust):
▢ 2 1/2 cups All-Purpose Flour
▢ 1 tsp Salt
▢ 1 cup (2 sticks) Unsalted Butter, cubes
▢ 1/2 cup Ice Water, 1 tbsp at a time
▢ 1 Large Egg, beaten (for egg wash)
▢ 1 tbsp Granulated Sugar
For the Classic Apple Filling:
▢ 6-8 medium Apples, sliced
▢ 3/4 cup Granulated Sugar
▢ 1/4 cup Packed Light Brown Sugar
▢ 2 tbsp All-Purpose Flour
▢ 1 tsp Ground Cinnamon
▢ 1/4 tsp Ground Nutmeg
▢ 1/8 tsp Ground Allspice
▢ Pinch of Salt
▢ 2 tbsp Unsalted Butter, small pieces
▢ 1 tbsp Lemon Juice, freshly squeezed
Instructions:
- Make the Pie Crust: In a large bowl, whisk together the 2 1/2 cups flour and 1 tsp salt. Add the cold, cubed butter. Cut the butter into the flour using a pastry blender or your fingertips until the mixture resembles coarse crumbs with some pea-sized pieces of butter remaining. (This is key for flakiness!)
- Add Ice Water: Sprinkle 1/2 cup of ice water over the flour mixture, 1 tablespoon at a time, mixing lightly with a fork after each addition, just until the dough starts to come together. Be careful not to add too much water. The dough should not be sticky.
- Chill Dough: Divide the dough in half, form each half into a 1-inch thick disk, and wrap tightly in plastic wrap. Refrigerate for at least 1 hour, or up to 2 days. (Chilling is crucial for a flaky crust and makes it easier to roll.)
- Prepare Apple Filling: In a large bowl, combine the sliced apples, granulated sugar, brown sugar, 2 tbsp flour, cinnamon, nutmeg, allspice (if using), and pinch of salt. Toss gently to coat the apples evenly. Stir in the lemon juice.
- Assemble the Pie: On a lightly floured surface, roll out one disk of chilled dough into a 12-inch circle. Carefully transfer the dough to a 9-inch pie plate. Trim the edges, leaving about a 1-inch overhang.
- Add Filling: Pour the apple filling into the crust-lined pie plate. Dot the top of the filling with the small pieces of butter.
- Add Top Crust: Roll out the second disk of dough into an 11-inch circle. Place it over the apple filling. You can make a solid top crust (cut slits for steam to escape) or cut it into strips for a lattice top.
- Crimp & Seal: Trim the top crust to match the bottom crust’s overhang. Fold the overhang under and crimp the edges decoratively to seal the pie.
- Egg Wash & Chill (Optional but Recommended): Brush the top crust lightly with the beaten egg wash. Sprinkle with the 1 tbsp granulated sugar, if desired. Chill the assembled pie in the refrigerator for 15-20 minutes before baking. (This helps the crust hold its shape.)
- Bake: Preheat oven to 400°F (200°C). Place the pie on a baking sheet (to catch any drips). Bake for 20 minutes. Then, reduce the oven temperature to 375°F (190°C) and continue baking for another 35-45 minutes, or until the crust is golden brown and the filling is bubbly. (If the crust starts to brown too quickly, loosely tent the edges with aluminum foil or a pie shield.)
- Cool Completely Crucial Step!: Transfer the baked pie to a wire rack and let it cool completely for at least 3-4 hours before slicing and serving. (This allows the filling to set properly; otherwise, it will be runny.)
- Serve & Enjoy: Slice and serve your beautiful homemade apple pie. It’s delicious on its own, or with a scoop of vanilla ice cream or a dollop of whipped cream. Savor every cozy, classic bite!
Recipe Notes:
- Cold Ingredients for Crust: Using very cold butter and ice water is essential for creating a flaky pie crust. The cold butter creates steam pockets as it bakes, leading to those lovely layers.
- Don’t Overwork Dough: Handle the pie dough as little as possible. Overworking develops gluten, which can make the crust tough instead of tender and flaky.
- Chilling is Key: Don’t skip the chilling times for the dough and the assembled pie. It helps the fat stay cold, prevents shrinkage, and makes the dough easier to work with.
- Apple Variety: Using a mix of apples provides the best flavor and texture. Some apples hold their shape well (like Honeycrisp or Braeburn), while others break down more and create a nice sauce (like McIntosh, though use sparingly as they can be very soft). Granny Smith adds a good tartness.
- Preventing a Soggy Bottom: Pre-chilling the assembled pie and baking on a lower rack for the initial part of baking can help. You can also lightly blind bake the bottom crust if you’re particularly concerned.
- Checking for Doneness: Look for a deeply golden brown crust and bubbling filling, especially in the center. An internal temperature of the filling around 200°F (93°C) is a good indicator.
- The Agony of Waiting (Cooling): This is the hardest part! But letting your apple pie cool completely is crucial for the filling to thicken and set. Slicing into a hot pie will result in a soupy mess.
- Lattice Top: For a lattice top, cut the second dough disk into even strips. Weave them over the filling, pressing the ends onto the bottom crust edge before crimping.
- Storage: Leftover apple pie can be covered and stored at room temperature for up to 2 days, or in the refrigerator for up to 4-5 days.
There you have it – your guide to baking the most heartwarming, delicious homemade apple pie with an unbelievably buttery and flaky crust! This recipe is a true labor of love that proves classic desserts are timeless for a reason. We hope you enjoy the process of creating this cozy masterpiece and sharing it with those you love! Happy baking!