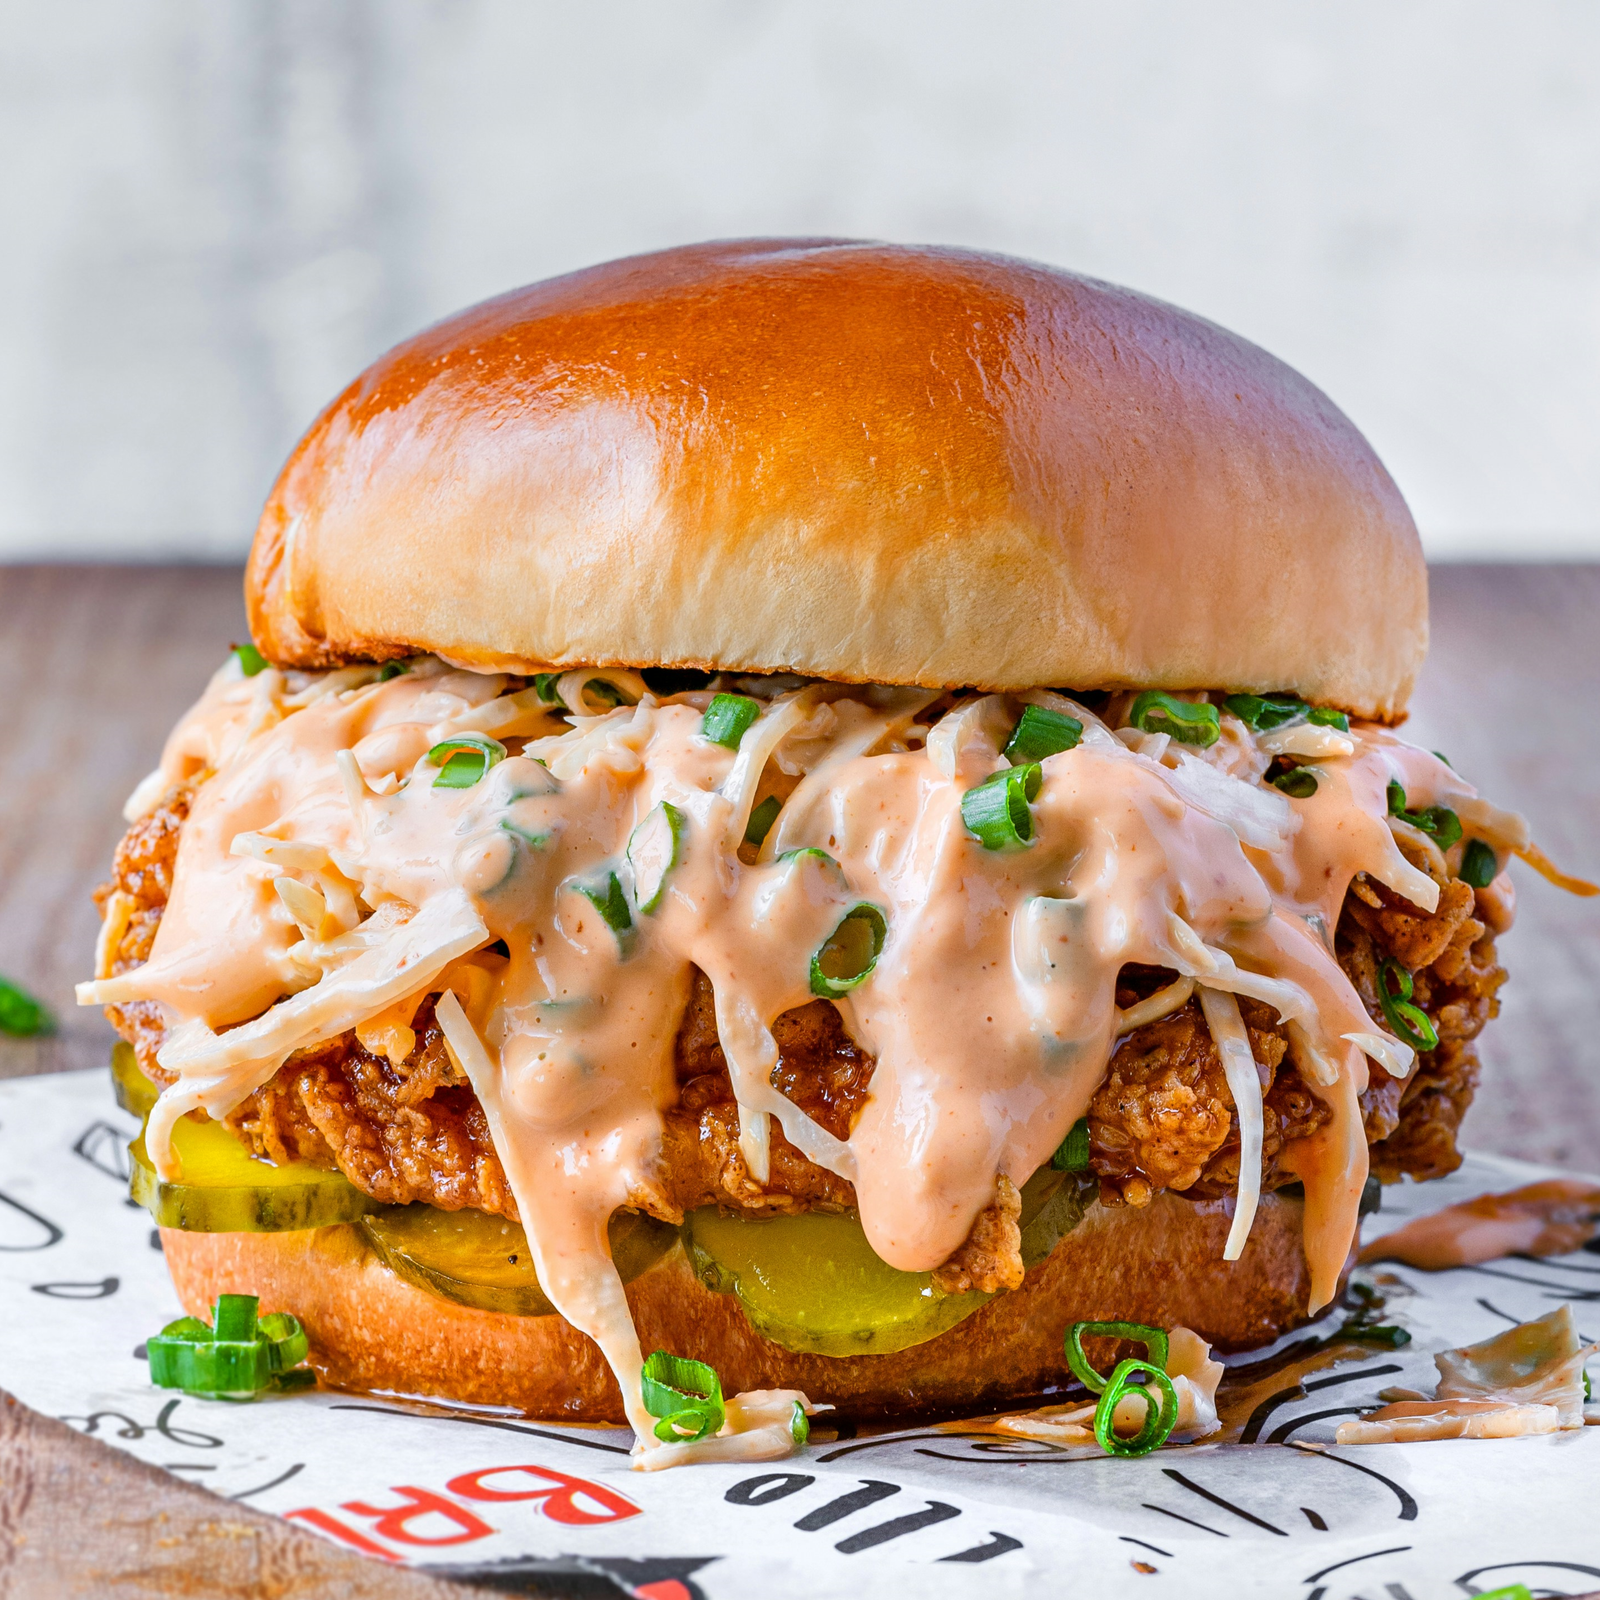
Forget the drive-thru and get ready to craft the ultimate Homemade Crispy Chicken Sandwich right in your own kitchen! Imagine biting into a perfectly seasoned, achingly crispy chicken fillet, nestled between soft, toasted buns with a tangy sauce and crunchy pickles. This isn’t just a sandwich; it’s an experience – a flavor-packed journey into comfort food perfection that will have you wondering why you ever settled for less. This masterpiece is perfect for a satisfying weekend lunch, a fun family dinner, or whenever that craving for pure, unadulterated deliciousness strikes. Let’s create some sandwich magic!
Time & Serving:
Prep Time: 30 minutes
Cook Time: 15-20 minutes
Assembly Time: 5 minutes
Total Time: 3 hours
Servings: 4 large sandwiches
Ingredients:
For the Chicken & Marinade:
▢ 4 boneless, skinless chicken thighs
▢ 1 cup buttermilk
▢ 1 tbsp hot sauce
▢ 2 tbsp dill pickle juice
▢ 1 tsp salt
▢ 1/2 tsp black pepper
For the Crispy Coating (Dredge):
▢ 1 1/2 cups all-purpose flour
▢ 1/2 cup cornstarch
▢ 2 tbsp smoked paprika
▢ 1 tbsp garlic powder
▢ 1 tbsp onion powder
▢ 1 tsp cayenne pepper
▢ 1 tsp salt
▢ 1 tsp black pepper
For Frying:
▢ 3-4 cups neutral frying oil
For the Special Sauce:
▢ 1/2 cup mayonnaise
▢ 2 tbsp ketchup
▢ 1 tbsp dill pickle relish
▢ 1 tsp hot sauce
▢ 1/2 tsp garlic powder
▢ 1/2 tsp onion powder
For Assembly:
▢ 4 brioche buns
▢ Dill pickle slices
▢ Lettuce leaves
Instructions:
- Marinate the Chicken: In a medium bowl or a resealable plastic bag, combine the buttermilk, 1 tbsp hot sauce, pickle juice, 1 tsp salt, and 1/2 tsp black pepper. Add the chicken pieces, ensuring they are fully submerged. Cover or seal and refrigerate for at least 2 hours, or preferably overnight for maximum flavor and tenderness. This step is crucial for juicy, flavorful chicken.
- Prepare the Crispy Coating: In a wide, shallow dish or pie plate, whisk together the all-purpose flour, cornstarch, smoked paprika, garlic powder, onion powder, cayenne pepper, 1 tsp salt, and 1 tsp black pepper until well combined. This dredge is the secret to that irresistible crust.
- Set Up Frying Station: Pour the frying oil into a large, heavy-bottomed pot or Dutch oven to a depth of at least 1.5 inches. Heat over medium-high heat until the oil reaches 350°F (175°C). Use a kitchen thermometer for accuracy, as correct oil temperature is key for perfectly fried chicken. Prepare a wire rack set over a baking sheet for draining the cooked chicken – this keeps the bottom crispy.
- Dredge the Chicken: Remove one piece of chicken from the marinade, allowing excess buttermilk to drip off (don’t pat it dry). Dredge the chicken thoroughly in the flour mixture, pressing the flour firmly onto all sides of the chicken to ensure it adheres well. For an extra crispy coating that shatters when you bite into it, dip the floured chicken back into the buttermilk briefly, then dredge it once more in the flour mixture (this is called a double dredge). Shake off any excess flour to prevent it from burning in the oil.
- Fry the Chicken: Carefully place 1-2 pieces of dredged chicken into the hot oil, being sure not to overcrowd the pot (overcrowding lowers the oil temperature, resulting in greasy chicken). Fry for 5-7 minutes per side, or until the chicken is deep golden brown, wonderfully crispy, and cooked through. The internal temperature should reach 165°F (74°C) when checked with a meat thermometer.
- Drain and Rest: Once cooked, carefully remove the chicken from the oil using tongs and place it on the prepared wire rack to drain. Season immediately with a tiny pinch of salt, if desired, while it’s still hot. Repeat the dredging and frying process with the remaining chicken pieces, always ensuring the oil returns to 350°F (175°C) before adding new pieces.
- Prepare Buns & Sauce (Optional): While the last batch of chicken is frying or resting, you can lightly toast the insides of your buns for added texture and flavor. If making the special sauce, simply whisk together all sauce ingredients (mayonnaise, ketchup, pickle relish, hot sauce, garlic powder, onion powder) in a small bowl until well combined. Taste and adjust seasonings if needed.
- Assemble the Sandwiches: Spread a generous layer of special sauce (if using) on both the bottom and top toasted buns. Place a hot, crispy chicken fillet on the bottom bun. Top with a generous layer of dill pickle slices and fresh lettuce leaves (if using). Place the top bun on, gently press down, and serve immediately. Be prepared for silence as everyone enjoys their incredible homemade crispy chicken sandwich!
Recipe Notes:
- Chicken Choice: Boneless, skinless chicken thighs are highly recommended as they are generally more forgiving and stay juicier during frying. However, chicken breasts work well too; just be sure to pound them to an even thickness for consistent cooking.
- Marinating is Key: Please don’t skimp on the marinating time! The buttermilk and pickle juice work together to tenderize the chicken and infuse it with fantastic, subtle flavor that forms the base of a great sandwich.
- Oil Temperature Control: Maintaining the correct oil temperature (350°F/175°C) is absolutely crucial for success. Too low, and the chicken will absorb too much oil and become greasy; too high, and the outside will burn before the inside is cooked through. A good thermometer is your best friend here.
- Don’t Overcrowd the Pot: Frying in small batches (1-2 pieces at a time, depending on pot size) prevents the oil temperature from dropping too much, ensuring a consistently crispy, golden-brown, and non-greasy result.
- Double Dredge for Extra Crisp: For that ultra-shatteringly crispy crust that everyone loves, the double dredge (flour -> buttermilk -> flour) makes a significant difference. It creates more nooks and crannies for that perfect crunch.
- Spice Level Customization: You can easily adjust the amount of hot sauce in the marinade and the cayenne pepper in the dredge to suit your personal preference for heat. Start with less if you’re unsure.
- Bun Selection Matters: Brioche buns offer a lovely touch of sweetness and a soft texture that complements the crispy chicken beautifully. Potato rolls or other sturdy, good-quality sandwich buns also work very well. Always toast them!
- Sauce Variations & Toppings: While the special sauce is delicious, feel free to use your favorite store-bought sauce (like spicy mayo, honey mustard, or a good ranch dressing) or get creative with other toppings like sliced tomato or coleslaw.
This Homemade Crispy Chicken Sandwich is a true labor of love, but one that pays off in every single delicious, crunchy, juicy, and flavor-packed bite. It’s a testament to how amazing homemade comfort food can be! Enjoy the process and the incredible results.